Parfaits

yogurt cups2This is a silly little post, but one I wanted to share all the same… I think we could all use some levity right now! Obviously, I started writing this at the beginning of the school year and it is now March, and quite possibly the end of school for the year (for those of us in the US anyway…) Anyway, with kids home all day and needing constant feeding, getting them to make yogurt cups is an easy way to keep them entertained for a while, and get snack taken care of at the same time. They don’t need supervision as there is no cooking involved and the mess should be limited… Right?

I took my Kindergartener shopping for a lunch box in August since he would be starting school – big school with his big brother. We shopped for a while before we found anything to his liking. And then, when we were almost done, he spotted snack cups. These cups have two compartments, connected by a middle section which also houses a spoon. He was thrilled by this discovery and insisted we buy two – one for him and one for his brother.

For the past week, these cups have been in constant use and a source of great joy and creativity. The cups can be used for dips with fruit or veggies, yogurt with toppings, cheese cubes and crackers or apple slices, or whatever you can dream up.  Of course, right now, packing snacks is not really a thing, but hear me out on the concept… We have found that the yogurt parfait has been a real winner, and the boys spend hours making their own concoctions. We try to always have plain greek yogurt in the house, so that is their blank canvas. They start with a stir-in, at this stage the favorite is an extract, typically vanilla, mint or lemon. Then they sometimes add some lemon juice or zest as well and often a drop or two of food coloring to go with the theme. Fruit purees made an entrance today, as well as a dash of juice from maraschino cherries which served as flavor, color, and sweetener. The toppings have included graham crackers crumbs, sprinkles, chocolate chips, cereal, granola, mini marshmallows, dried fruit, nuts, pumpkin seeds…

yogurt cups

The resulting snack is mostly a high protein unsweetened yogurt, with just enough fun, sweetness and crunch to make it exciting. And the best part is watching the boys spend ages in the kitchen dreaming up concoctions, digging for ingredients, zesting lemons, pureeing raspberries, squeezing oranges, chopping strawberries to just the right size and then even naming their special blends!

And now, with my husband ever more focused on healthy eating habits, I have introduced chia pudding. Chia seeds are high in protein and fiber, and when soaked, become gelatinous, creating a pudding-like consistency. If you soak them in coconut milk or kefir, you have basically created a superfood, with very little fuss, and even kids will eat it, especially with a little maple syrup or honey added, and perhaps a dash of vanilla extract or lemon zest. The pudding mixture can be run through a blender if desired, for a smoother finish. I would mix, blend, and then refrigerate for at least 2 hours, or overnight. Finally, top with fruit or crunch or a scoop of yogurt. Bananas or pineapple cooked until caramelized add a delicious sweetness and flavor. Again, you can give your creativity free reign, or soak the seeds overnight and then let the kids fancy up their own puddings in the morning. Here are the basic ratios/ ingredients for one serving.  Play around and see what works for you! This can be breakfast, snack, or dessert.

chiapuddings


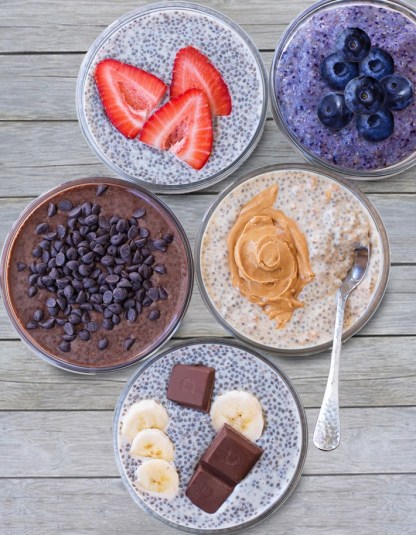
  • 2 tablespoon chia seeds
  • 1/2 cup almond milk, coconut milk, cashew cream, or other milk of choice
  • 1 teaspoon honey, maple syrup, or other sweetener, as desired
  • pinch of salt
  • dash of vanilla or other extract
  • 1 tbsp cocoa powder for a chocolate chia pudding, maybe with some chocolate chips too?
  • fruit, granola, yogurt or other toppings of your choice


We have to talk about something other than that virus sometimes, so why not frivolous parfaits?! And aren’t they pretty? I hope the colors cheer up your day! Have a parfait day!

Rhubarb Cake

rhubarb
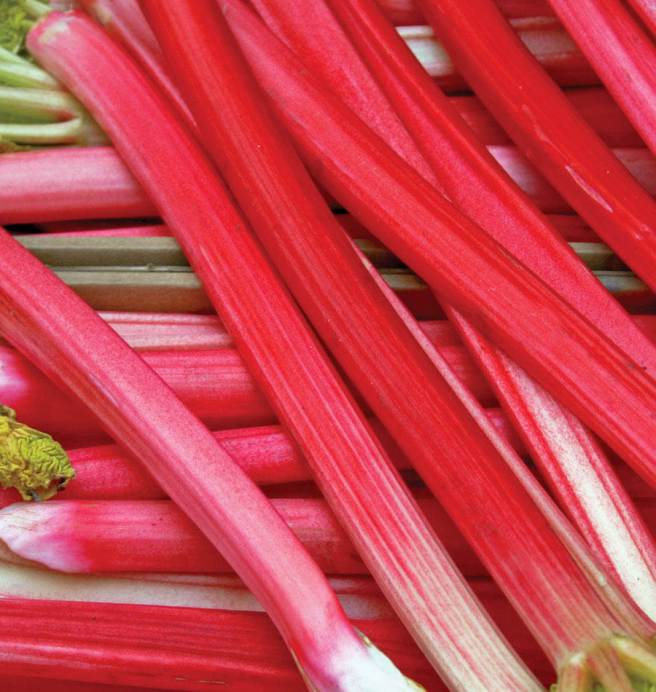
I have never cooked with rhubarb before. It has been one of those aspirational ingredients that I see when it appears in the seasonal displays and imagine making into wonderful treats. Then I either buy it and let it rot in the fridge because I have no idea what to do with it (not very Earth friendly or economical), or I decide to wait until I have a good recipe and then never actually get around to finding one or taking any further action. My mom always speaks fondly of rhubarb, and I have enjoyed it when other people have prepared it, but it somehow always daunted me.

But this week, I bought some. And I found a recipe. And I actually made it! The boys helped me and even so, it took less than half an hour to get the mixture into the oven. It bakes for a while (about 45 mins), but it was done in time to sample our handiwork after supper. The rhubarb was tart and zesty, the cake was moist and scented with vanilla. We added some strawberries because they were about to get mushy and that worked wonderfully too. Both boys absolutely loved the cake and had no concerns about the tart and unfamiliar rhubarb. And they loved mixing and measuring and sprinkling the top with colored sugar. The crunch from a sprinkle of sugar is really delightful, and if you have sugar in different colors, why ever not turn your cake into modern art?

This recipe is really very easy to make, and not at all intimidating. The rhubarb does not even need any cooking or special treatment. You just slice it and mix it right into the batter. And it plays really nicely and adds a whole new dimension to the cake. Please try it next time you see a beautiful fresh red display of rhubarb and see how friendly it really is! (This recipe is originally from The View from Great Island.)

Ingredients

  • 1/2 cup half and half  with 1tsp lemon juice (or use buttermilk or half greek yoghurt and half milk)
  • 1 stick (1/2 cup, 113 grams) unsalted butter at room temperature
  • 1 cup (214 grams) granulated sugar plus 2 tsp for sprinkling
  • 1 large egg, at room temperature
  • 1 1/2 tsp vanilla extract
  • 2 cups (256 grams) all purpose flour, plus 1 Tbsp to toss with rhubarb
  • 2 tsp baking powder
  • 1 tsp salt
  • 2 cups thinly sliced rhubarb


Instructions

  1. Set oven to 350F (180C). Butter or line a 9×9 square baking pan.
  2. Cream the soft butter and sugar using a mixer or a willing child 😉 Beat in the egg and vanilla, scraping down the bowl as necessary.
  3. Whisk together the flour, baking powder, and salt.
  4. Take 1 Tbsp flour to the rhubarb and toss well.
  5. Add half of the flour mixture to the butter mixture and blend in. Add all of the half and half, and blend in. Finally add the rest of the flour and blend just until combined, don’t over mix. Fold in the rhubarb. Note: the batter will be thick.
  6. Spread the batter into the prepared pan and sprinkle the top with a little sugar (or sprinkles or colored sugars of your choice!).
  7. Bake for about 40-45 minutes, or until the cake is turning golden and a toothpick in the center comes out without wet batter clinging to it (moist crumbs are fine.)
  8. Let the cake cool slightly before cutting.

Serve with cream, vanilla ice cream or custard.

Delightful!

Whole wheat waffles

A few years ago, my husband and I went a brunch hosted by a dear friend of mine, and she had carafes of waffle mix prepared and ready next to her state of the art waffle iron. Each guests could choose a mix that was to his liking, and make a waffle fresh and hot for his personal enjoyment. Now, I say his, because my husband was so taken with this nifty waffle making gadget, that he probably could have eaten waffles all day.  So for his next birthday, I got him the self same waffle iron.  It was a wonderful success and he loved it. This is a pretty deal around here, because this man never needs anything (that he hasn’t already ordered for himself on Amazon) and is impossible to buy gifts for, which means that my ideas are often far-fetched and far from home runs. But not this time! I had finally hit home with this nifty gadget that can make delicious fresh hot confections in minutes. So now we are the proud owners of a Belgian Waffle Maker. Of course, he has never made waffles, but I suppose that was never the idea. He gets waffles made for him, and really what could be better?!

Our favorite waffles have always been pumpkin waffles, made with fresh pumpkin. But the batter takes quite a bit of work to make, including roasting pumpkin, so we don’t do it that often. A short while ago, however, I discovered this remarkable recipe. It uses only a few basic recognizable ingredients, contains whole wheat and very little sugar, and is super easy to make. My 2 year old and I threw together the batter and made the waffles by 8am. Oh, and the waffles are delicious. When we made them over the weekend, all 3 boys declared these the best waffles we have ever made. So, this is my new go to recipe, and one I feel pretty good about feeding to my family.

Ingredients

  • 1 1/2 cups whole wheat flour
  • 2 teaspoons baking powder
  • 1/2 teaspoon salt
  • 2 tablespoons sugar
  • 1 large egg
  • 1 1/2 cups milk
  • 1/3 cup melted butter (or maybe you could try coconut oil or vegetable oil)
  • food coloring (optional – only necessary if your kids are obsessed with colored food)

Method

  1. Preheat your iron while you make the waffle batter.
  2. Mix together the flour, baking powder, salt, and sugar.
  3. In a separate bowl, whisk together the egg, milk, and butter.
  4. Mix together the wet and dry ingredients, stirring just until combined. The batter will be a bit lumpy; that’s OK.
  5. Spray or brush the iron with oil of your choice and pour in the  batter. When the waffle iron beeps, get ready to feast!

waffles


Our latest batch of waffles were blue, because my 2 year old is currently obsessed with adding food coloring to everything and blue is his favorite color. Without the food coloring, they are a lovely nutty brown. Both ways, they taste great!


Our waffle maker makes 4 square waffles and I get 2 scant rounds out of this batter, so about 8 waffles, which is perfect for our family. We usually eat about 6 for breakfast and then the boys have the last 2 later that day. We don’t have leftovers for days, which I like.

We eat ours with yoghurt and fruit, and a drizzle of maple syrup. We also often add a poached egg.

Original recipe from http://www.kingarthurflour.com/recipes/

Leftover rice pudding

rice-puddingI attended an Immigrant and Refugee forum hosted by Mayor Hancock of Denver today. I am proud of everything Denver is doing to make the safety, health and wellbeing of ALL its people a priority, but I am still nauseated by the executive orders raining down and the resulting fears and concerns that plague many of my fellow Denverites. This recipe is a way of taking a break, and possibly settling a few stomachs, at least for a little while.

Why so much leftover rice…? I never seem to know how to measure rice to make the right amount for the number of people I need to serve. Or I plan on feeding kids who love rice and then suddenly that day they want none of it. Or I forget that Asian restaurants send rice with each entree and order extra rice per person, and then invariably discover that each serving is enough for at least 2 to 3 hungry men. Whatever the reason, whenever we have rice for a meal, there is always a ton left over. And you can only reheat rice so many times… But since we discovered that you could make rice pudding out of left over rice, we cook too much rice on purpose!

This rice pudding is delicious and in my mind a good alternative to oatmeal or any other breakfast porridge or cereal – at least it contains some eggs for protein. More about protein some other time, but suffice it to say, I am a bit of protein pusher. I really think it makes a difference to everyone’s disposition and wellbeing. Anyway, back to left over rice. This is suuuuper easy and totally delicious. It can be breakfast or dessert with equal ease. Give it a try and let me know your thoughts!

  • 3 cups whole milk
  • 1 cup heavy cream (you can just use more milk if you prefer but cream is extra yummy)
  • 4 large eggs, beaten
  • scant 1/2 cup sugar (whatever you have or prefer – coconut sugar, granulated, light brown… I try to limit the sugar I put in so you can sweeten to taste if needed and avoid extra sugar where possible, hence just a scant 1/2 cup)
  • 1 teaspoon vanilla extract
  • lemon zest from 1 lemon (be careful not to zest too deep – or watch the kids closely if they are on lemon duty – because the bitter pith will ruin the whole thing – we’ve done this and it was tragic)
  • 5 whole green cardamom pods
  • 1/4 teaspoon freshly grated nutmeg
  • 3 cups cooked left over rice (I have always used basmati or similar but you can try other kinds and let me know how it goes)

You can add raisins or cranberries in the middle of cooking, or sprinkle with nuts when serving if you like. Actually fresh berries or mango might be nice too. We never do any of this because we love the plain creamy comforting texture, and it is quite tasty enough as is.

Now simply throw everything into a slow cooker, whisking together milk, cream, eggs, sugar, vanilla, zest, cardamom pods, and nutmeg. Then stir in rice, cover and cook on high 1 -2 hours, stirring occasionally if you remember. When it is nice and porridgy and all the liquid has absorbed, your pudding is ready. You can leave it in the slow cooker on low for a while, or turn it on whenever you are ready to serve it. The boys like to drizzle with honey and dust with cinnamon, and sometimes add a bit of milk, mainly to cool it down so they can eat it faster.

Hope you like this as much as we do! Please let me know if try it or enhance it!

(Recipe adapted from Epicurious.com)

Simple shrimp gnocchi

Kid night is coming up again, so before we get onto our next interesting choice, I wanted to share this shrimp gnocchi recipe in case you want to try it with your family… If you do, please let me know how it goes!

It fullsizerenderturns out that shrimp gnocchi is fancy enough to serve to guests (double the recipe!) and simple enough to make for kids any night of the week (shown here without basil garnish). It is a surprisingly delicious and rich meal but really easy to make! I would never have thought it would be such a hit with my family, but thanks to Blue Apron, we gave it a try, and this is our slightly adapted recipe.


Ingredients

  • bag (about 1lb) of raw frozen shrimp (tails and shells off)
  • package gnocchi (about 16oz)
  • basket (6 to 10oz) cherry tomatoes (I may use peeled and chopped tomatoes next time to get rid of the skins which kids object to)
  • 3 cloves garlic (or as much as you like!)
  • bunch fresh basil
  • 2 tablespoons butter
  • 3 tablespoons mascarpone (you can just use more butter but I love the creaminess of mascarpone)
  • 2 to 3 tablespoons tomato paste
  • 1 shallot
  • optional saffron threads or powder
  • olive oil
  • salt & pepper
  • water


Method

Prepare your ingredients ahead of time. This is new trick I have learned and it really does make it difference. You can do it while the little one is napping, or the kids are at school or watching a show or happily building and knocking over block towers. It needn’t take long and it will make cooking much easier and quicker when every one is cranky and in your space. I feel much less stressed around 4:30pm knowing I have a plan and some basic ingredients ready to use. (Not that I do this every day of course! Some days we are wailing and making peanut butter and banana sandwiches at 5:15pm…)

  • So, whenever you have a moment, peel and finely chop the shallot, peel and mince the garlic, halve (or peel and chop) the tomatoes and season with salt and pepper. (I am sure you could probably use a can of tomato, onion and garlic too and make this even easier). Pick the basil leaves off the stems. Make sure the shrimp have defrosted, and pat dry. Gather the other ingredients so you  have everything at hand.
  • When you are ready to start, put a pot of salted water on to boil and get a large pan to start the sauce, preferably non stick.
  • For the sauce, add olive oil to a pan over medium high heat. Add garlic and shallot. Allow to soften 1 to 2 minutes then add butter and tomato paste. Let is darken a bit, and add 1/4 cup water.
  • Season shrimp with salt and pepper and add to the sauce. Add saffron if using.
  • While shrimp cook in the sauce, add gnocchi to pot of boiling water. Cook 2 to 3 minutes until gnocchi float to the top.
  • To the sauce, add drained gnocchi, seasoned tomatoes, mascarpone, 1 tablespoon olive oil and half the basil leaves, tearing as you go. Mix well and allow tomatoes to soften, 2 to 3 minutes.
  • Serve and garnish with remaining basil.

Buon appetito!